How to attach timesheets to the invoice
Invoice Wizard
Detailed time entries information (Timesheet Details Report) attached to the invoice
Timesheets Details and Invoice as one PDF
Change file type of “attached timesheet details” attached to the invoice
Custom name on “detailed Timesheet”
How to attach timesheets to the invoice
In zistemo you have to ways to attach the timesheet to the invoice
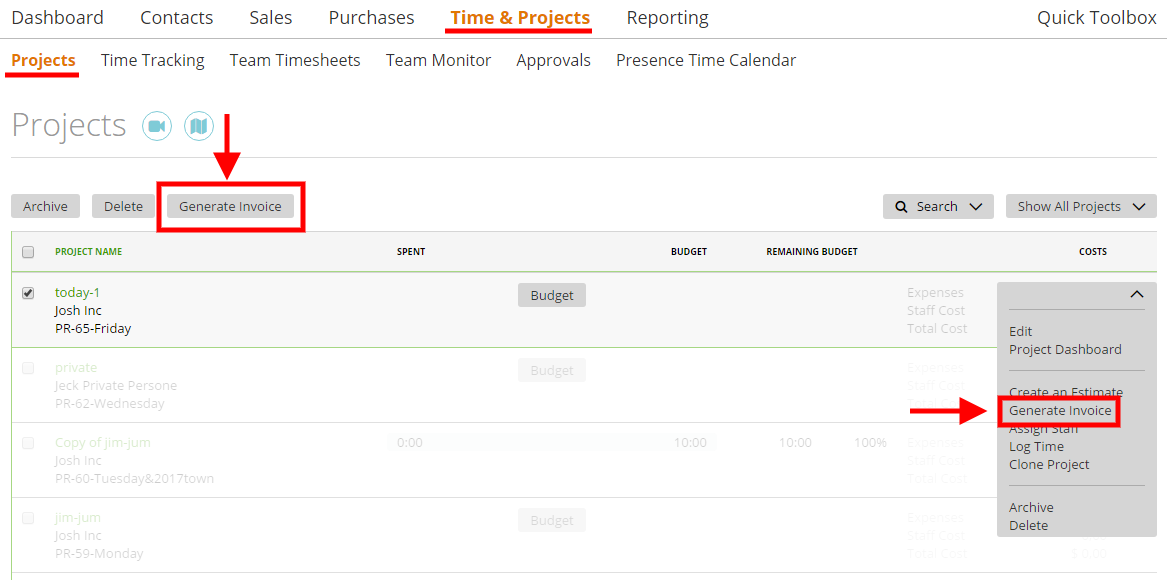
1. You can create an invoice based on the project (will include all the time your staff spent working on a specific project) (Time & Projects ➝ Projects ➝Click the box next to the needed project ➝ Click ‘Generate Invoice’ button):
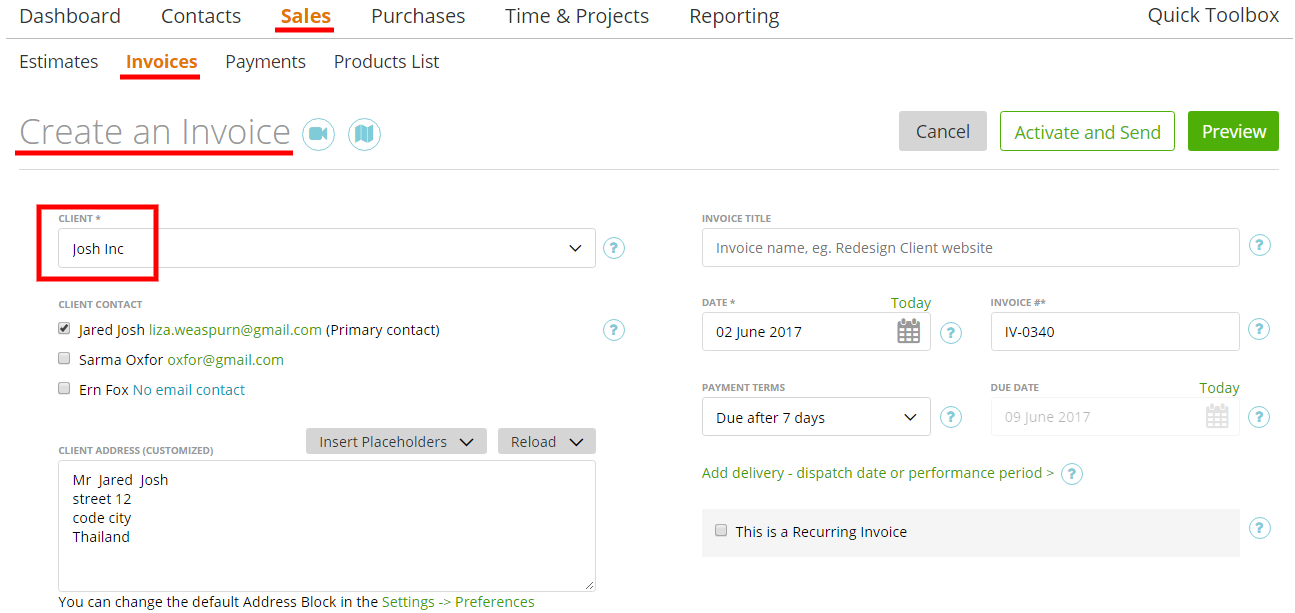
2. Or you can add staff hours to the invoice during the invoice creation step. In order to do so, first, choose the client (Sales ➝ Invoices ➝ Create Invoice):
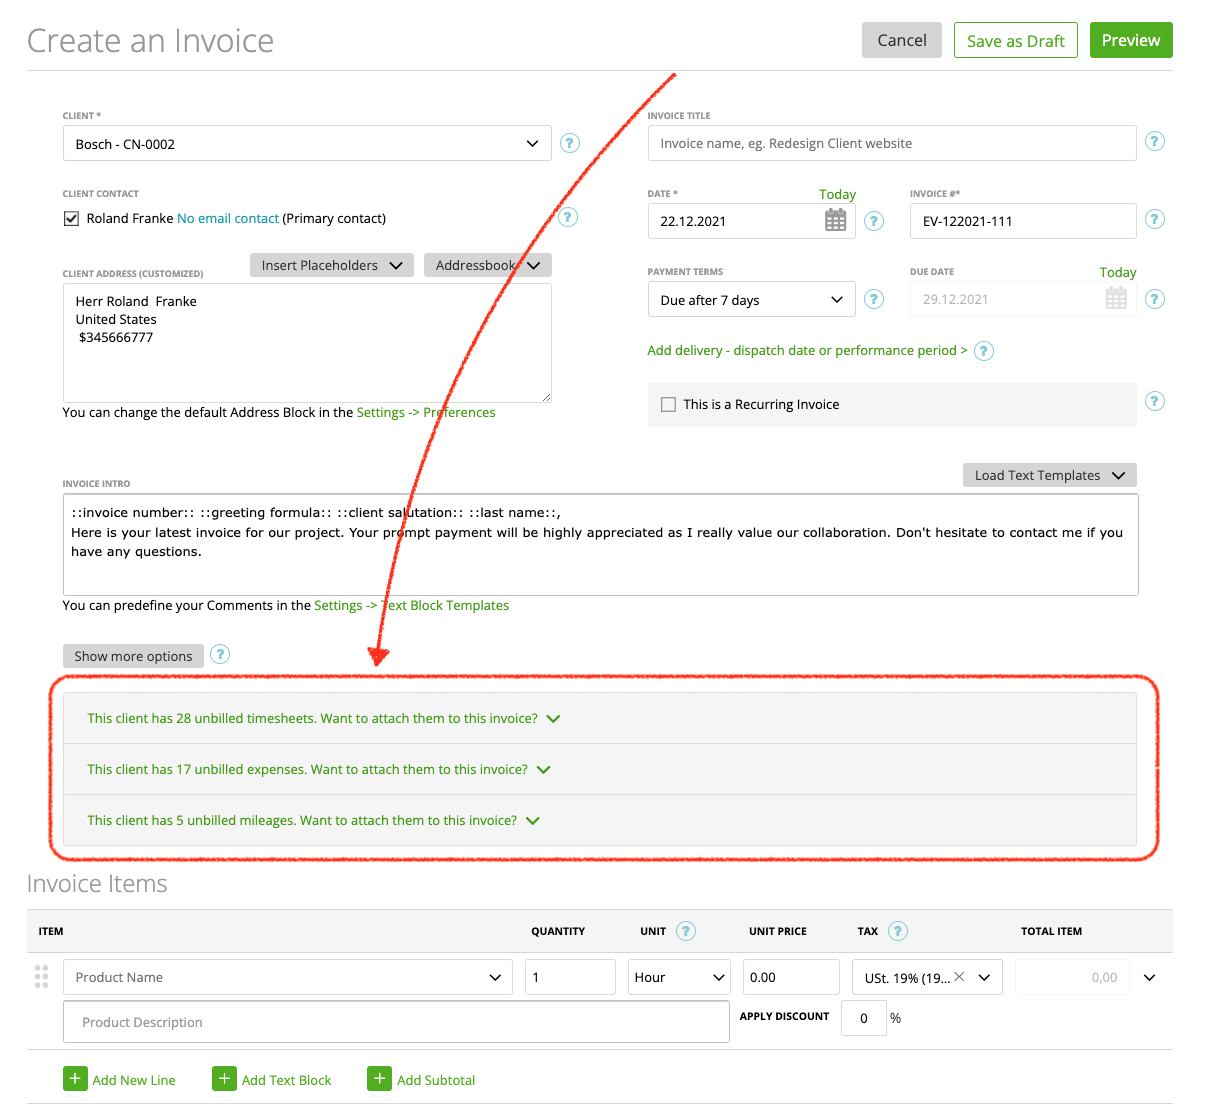
If this client has the projects with unbilled time, you will see a link to attach these hours to the invoice:
Invoice Wizard
The next step to succesfully attaching timesheets to the invoice is via the Invoice Wizard
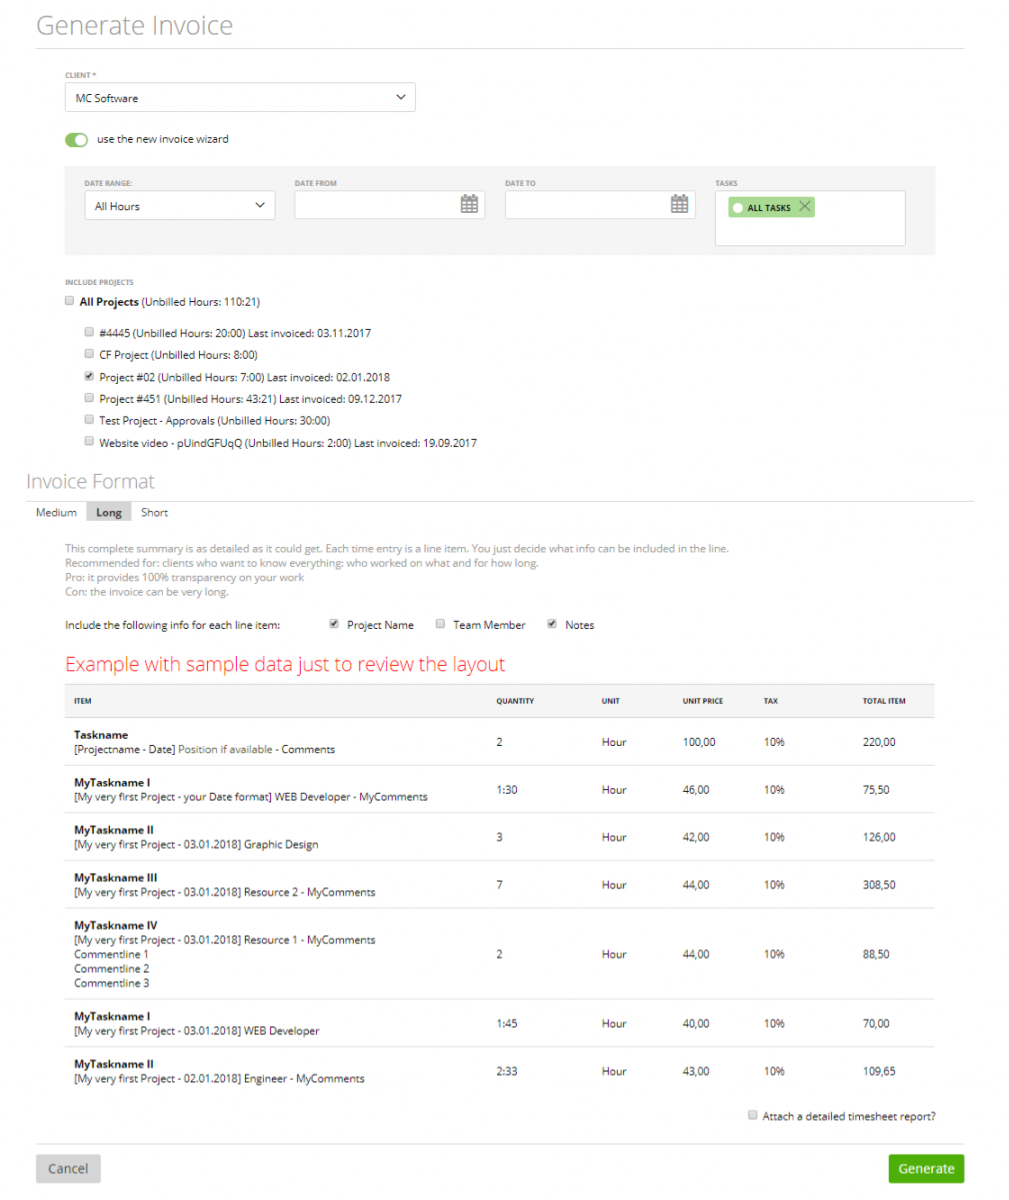
– Client
In the first drop-down field, you can pick the client that should be invoiced:
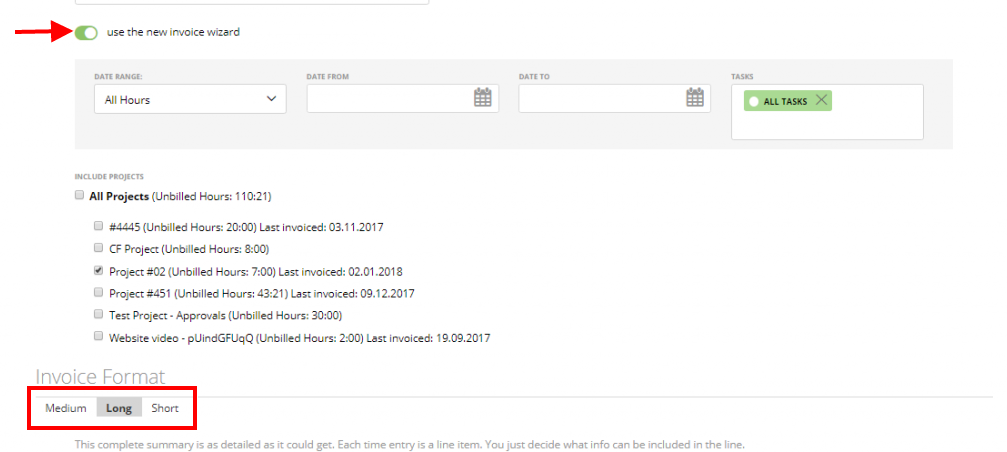
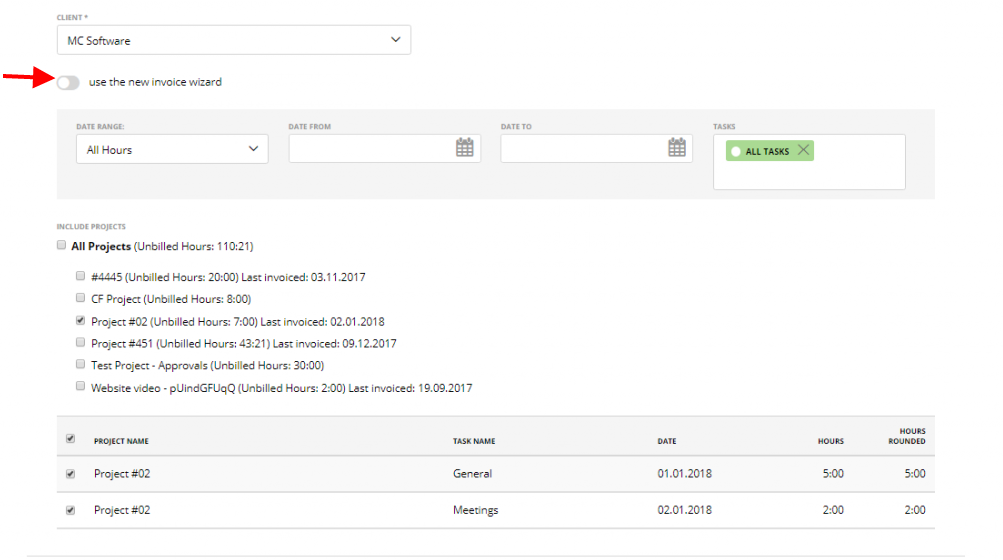
– Slider ‘use the new invoice wizard’.
If it’s switched on (green), then you can group time entries logged to the timesheet by using the ‘long’, ‘medium’ or ‘short’ format read (more about it below).
If it’s switched off (gray), this tool doesn’t group the information and your invoice will include all time entries logged to the timesheet:
– Limitation
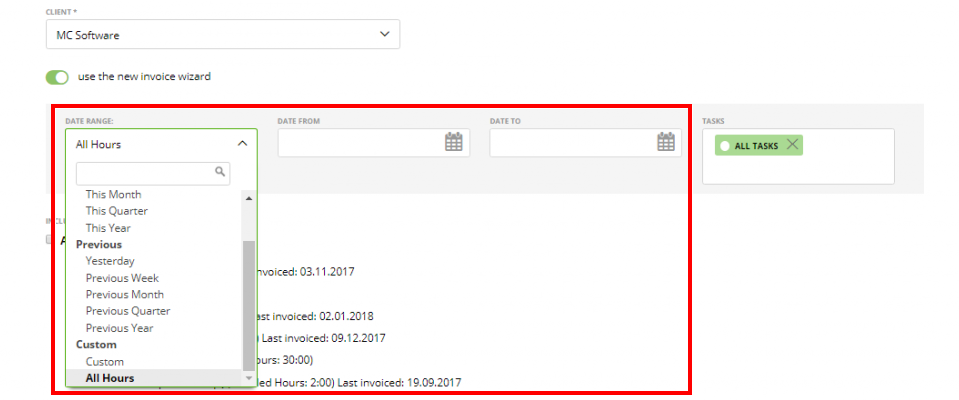
You can choose all the time logged to timesheet or filter the time logged by selecting a specific date range:
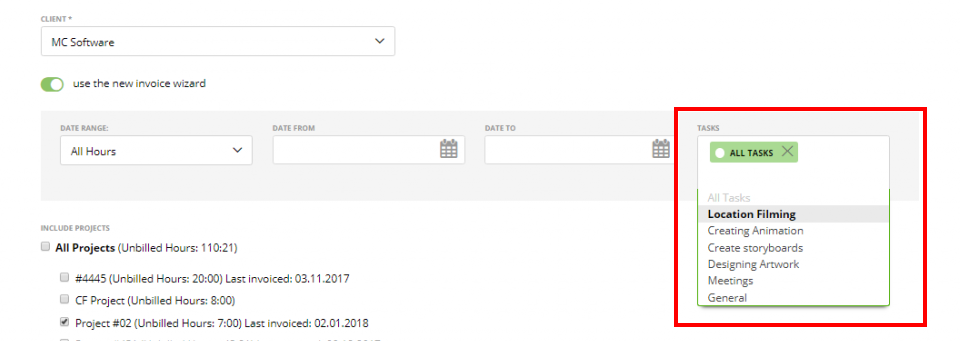
Also, you can pick only the time logged on some tasks:
– Projects
Here you can choose one, several or all the projects related to a client – its’ logged time will be included on the invoice:
– Invoice Format
Here you can see three options ‘Long’, ‘Medium’ and ‘Short’:
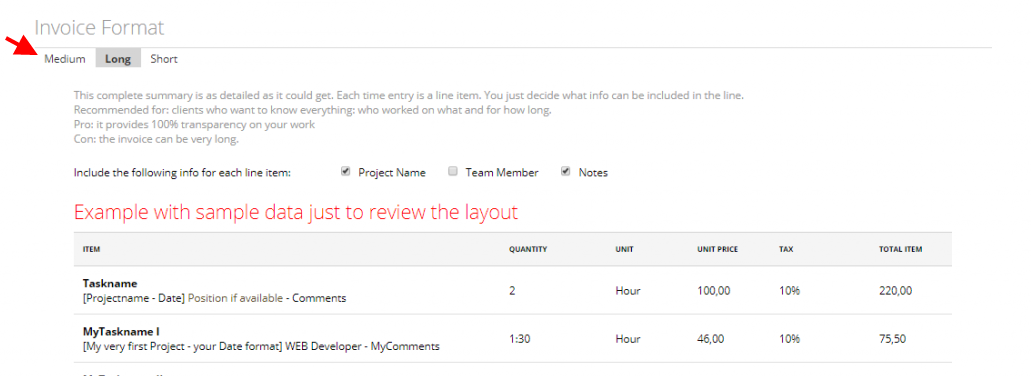
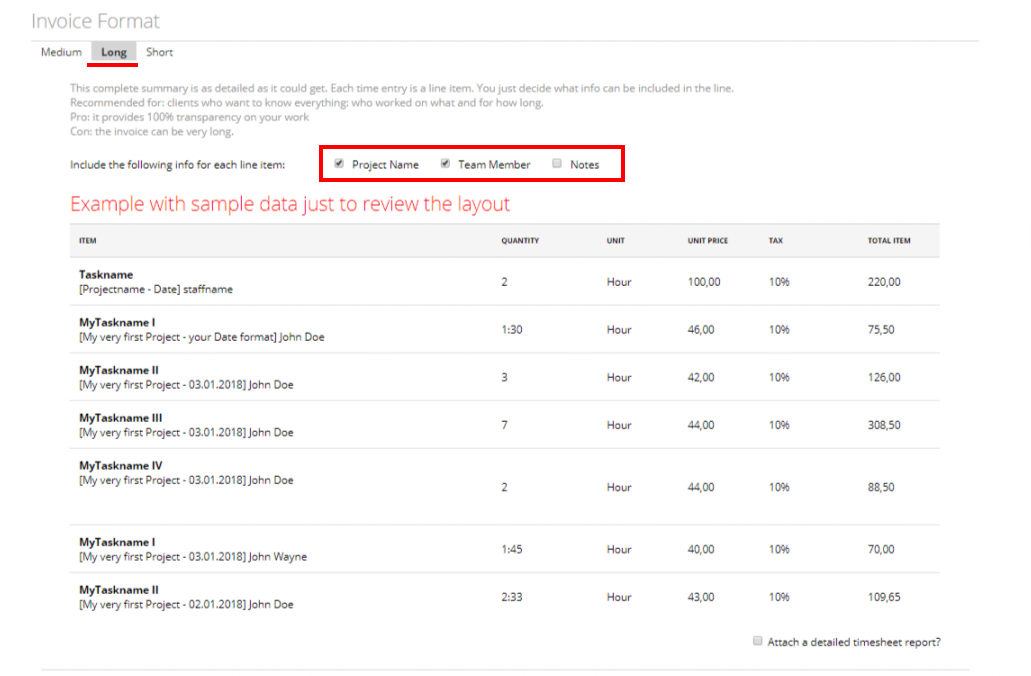
Choose the ‘Long’ format if you want to see time entries displayed on separate lines (without grouping).
Here you can also uncheck ‘Project Name’, ‘Team Member’ and ‘Notes’ if you don’t want to have this information on the invoice. How will the invoice item table look in this case? Please, see the sample shown below:
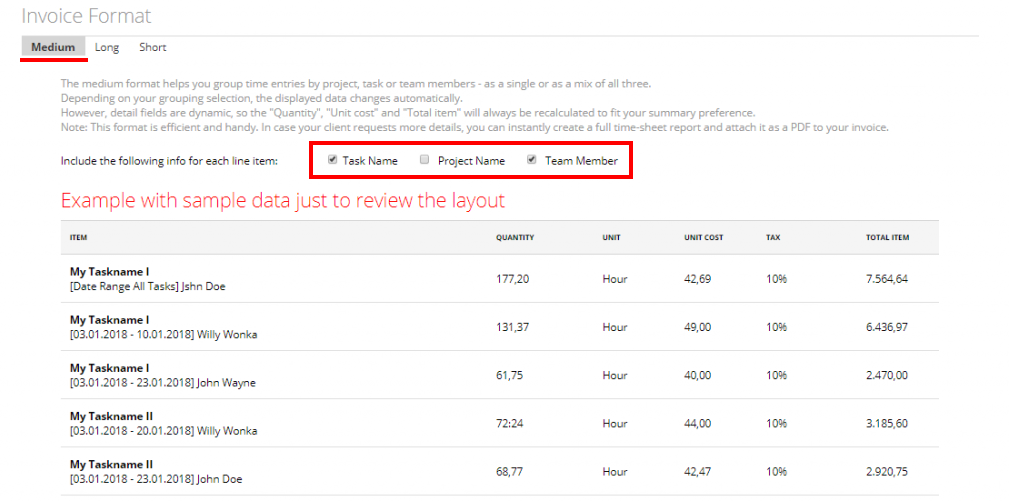
Choose the ‘Medium’ format if you want to group information. If there are time entries logged by one member to an open task and project, then this info will be displayed in one invoice line (as summary).
Also, you can uncheck ‘Task Name’, ‘Project Name’ and ‘Team Member’. When you uncheck, for example, ‘Team Member’, then all the time logged by any members to one project and task will be grouped in one line. The same happens if you uncheck ‘Project Name’ (all the time logged by one member to one task will be grouped, regardless of the project it belongs to) or ‘Task Name’ (all time logged by one member to one project will be grouped, regardless of the tasks).
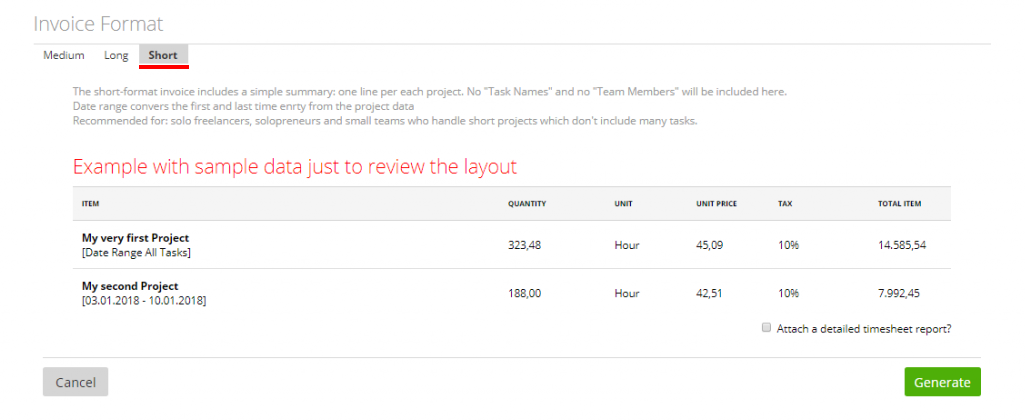
Choose the ‘Short’ format if you want to have only one summary line per project – all time entries logged to one project will be grouped in one line:
Timesheet Details attached to the Invoice
If you wish you can attach the Timesheet Details Report with the detailed information about all time entries logged to your invoice by all staff members to all projects (which are chosen on the wizard page) – just check ‘Attach a detailed timesheet report’
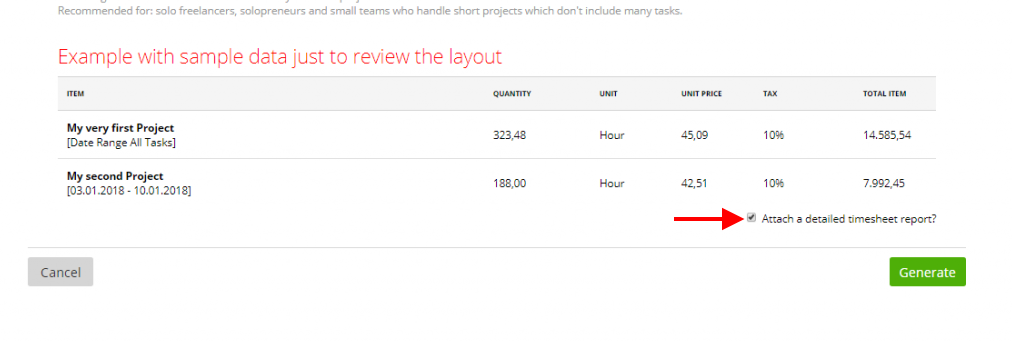 In this case, you will have this report as a PDF attachment to the generated invoice.
This feature is especially helpful if you don’t want to have all time entries featured in invoice item table (if you group this information and only display a summary) but your client needs the detailed timesheet report. After clicking ‘Generate’ on the Invoice Wizard, you will see this report attachment below the invoice items table:
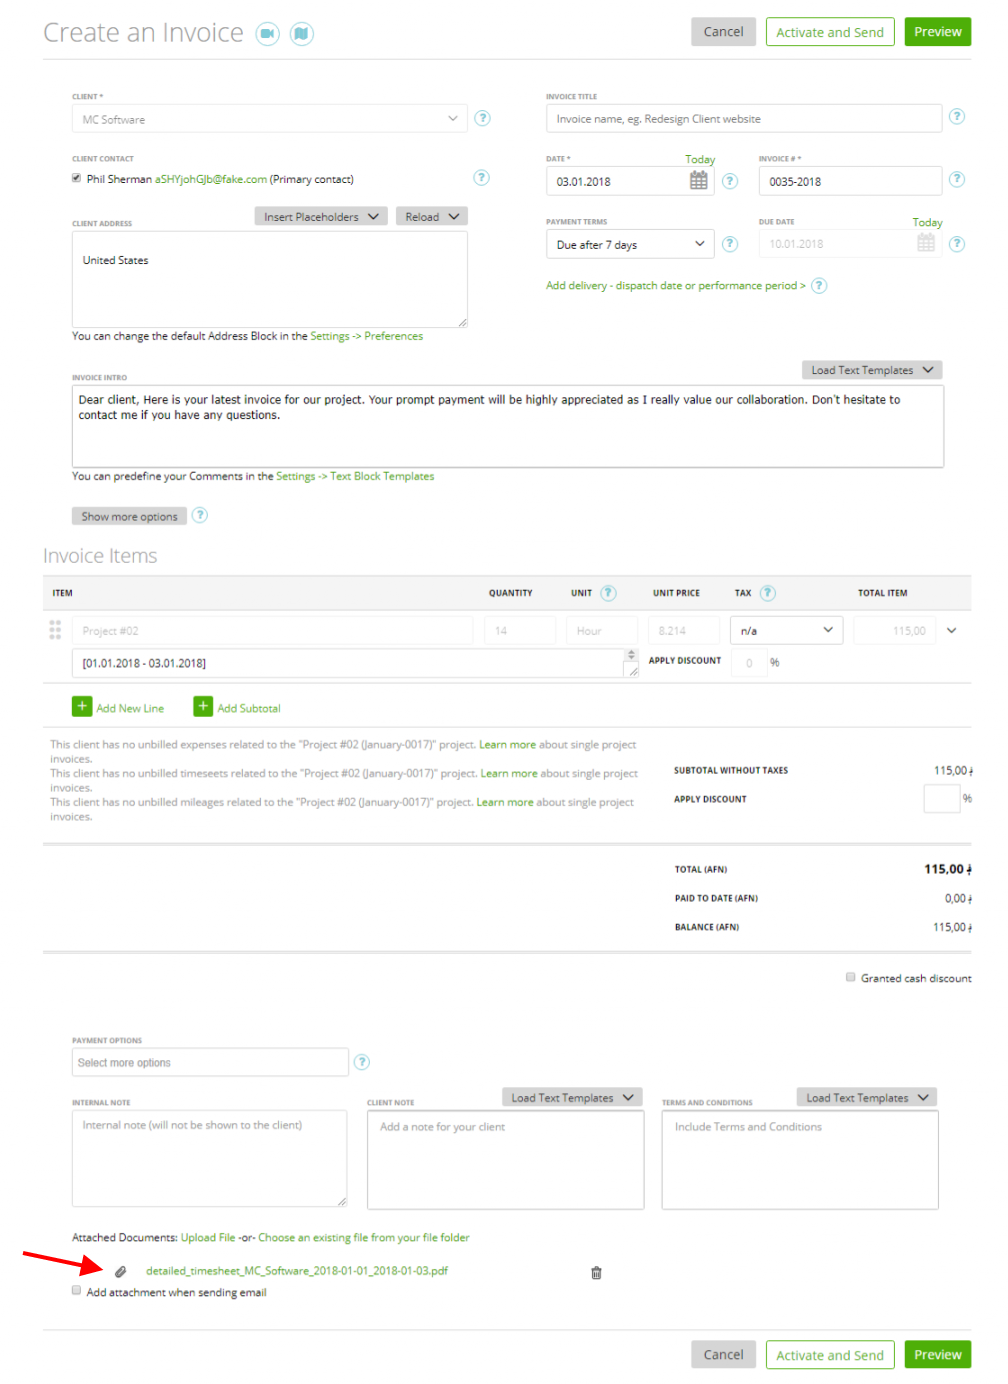
Or below the invoice document on Invoice Preview page:
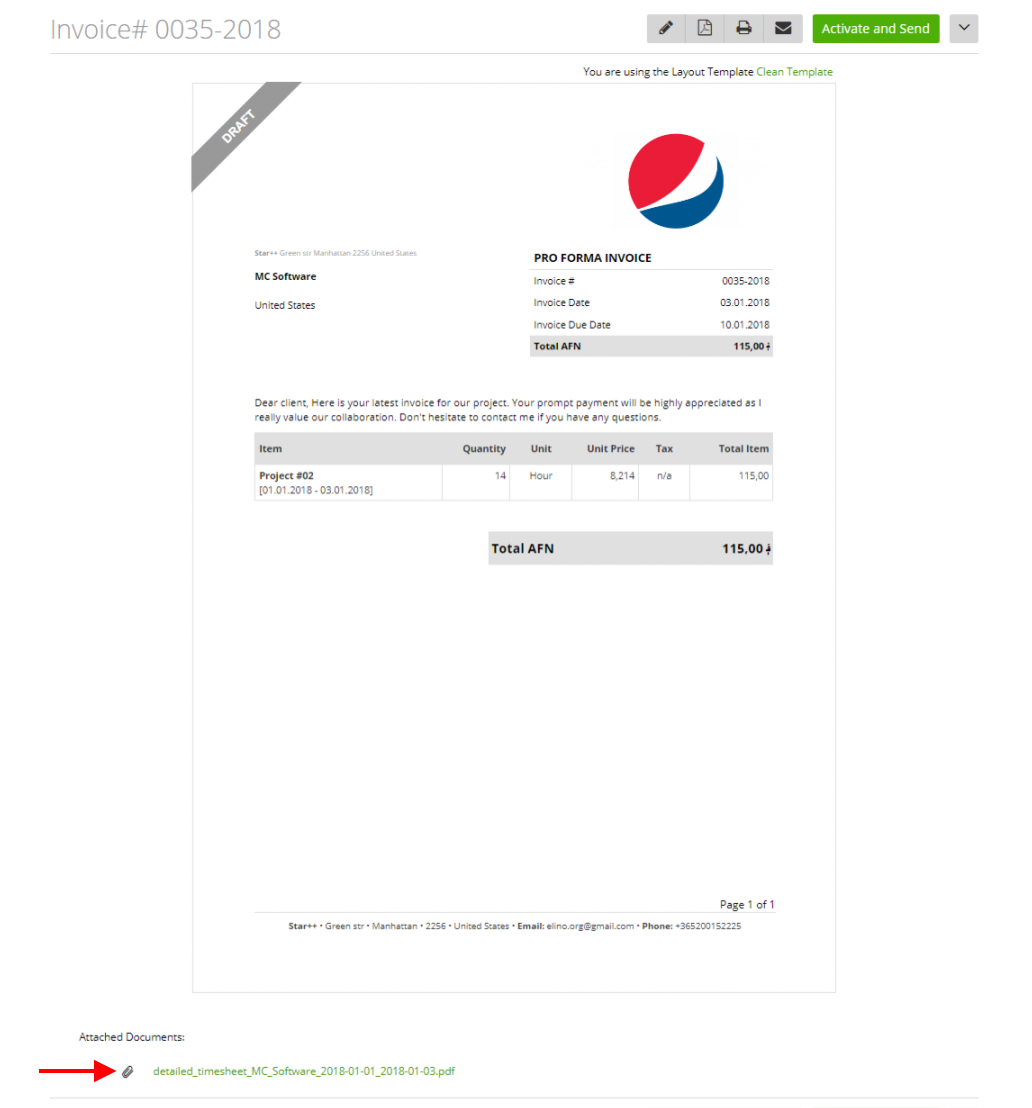
Just click this green link to open and review the timesheet report.
You can also set up that for specific clients the detailed timesheet should be added by default, so the checkbox is already checked. Learn more about add detailed timesheet by default →
Invoice and Timesheet Details as One PDF File
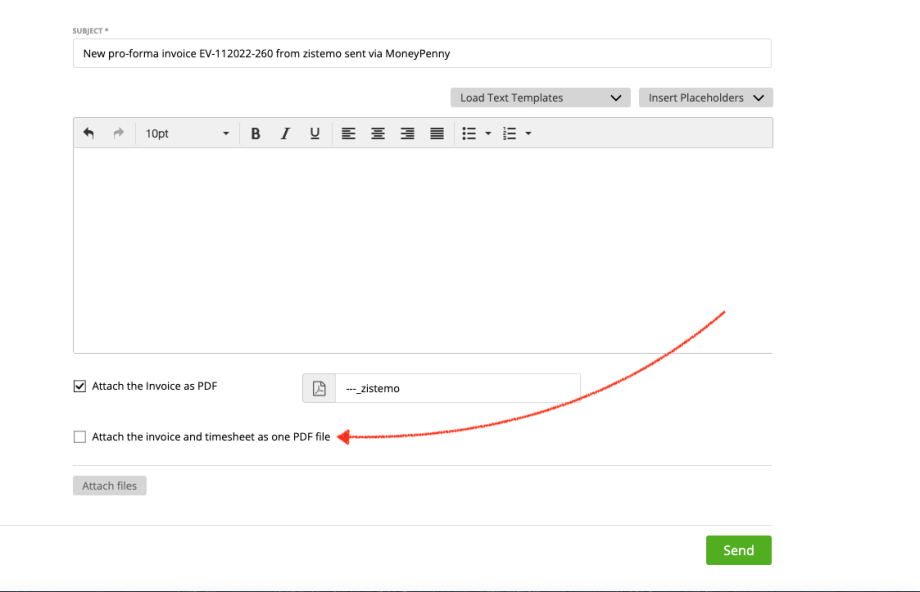
When sending the invoice with the timesheet details you can send the invoice and the timesheet details as one PDF File. Just select “Attach the invoice and timesheet as one PDF file”.
Change file type of attached timesheet details attached to the invoice
You can change the file-type your client receives, if you send an invoice with attached timesheet details. You can choose between ZIP or PDF. ZIP is always set as default.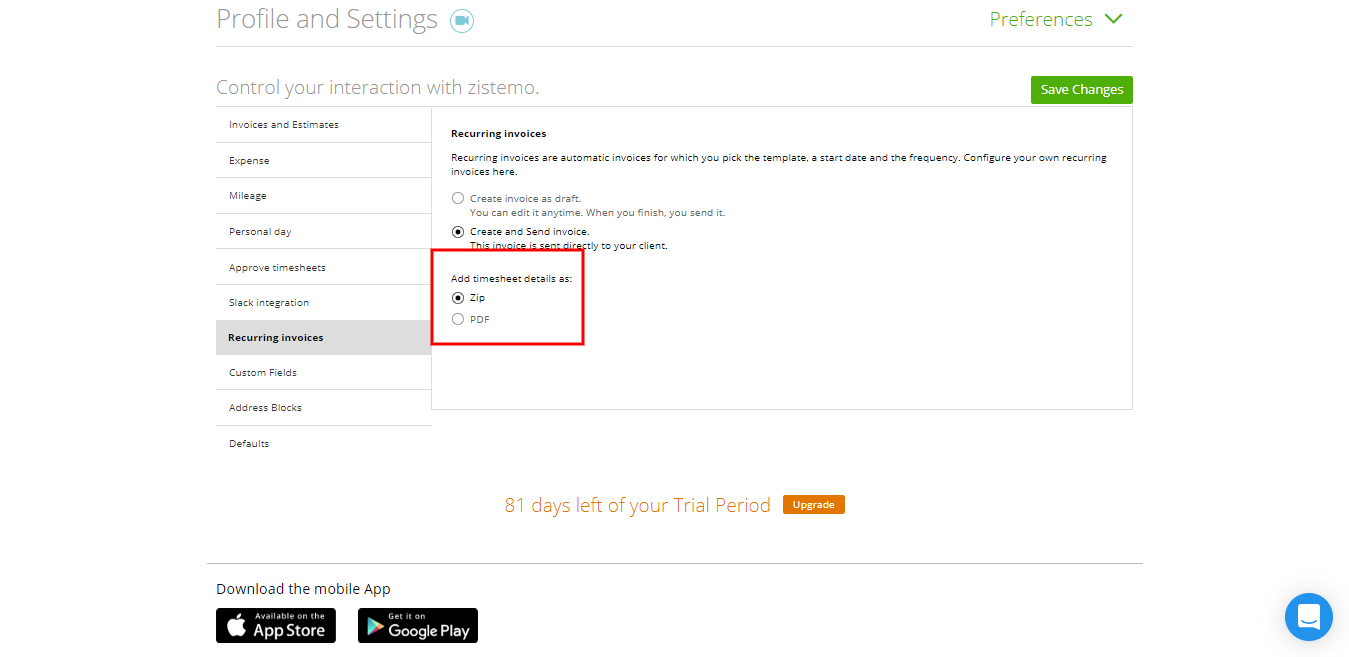
Custom name on detailed Timesheet
You can either change the name of detailed timesheet manually when attaching to an invoice, or you can set up a custom name on the preferences.
Change name manually when attaching to invoice
You can change the name of the “detailed Timesheet” which will be attached to the invoices. Simply create your invoice as always and mark “attach a detail timesheet report” first:
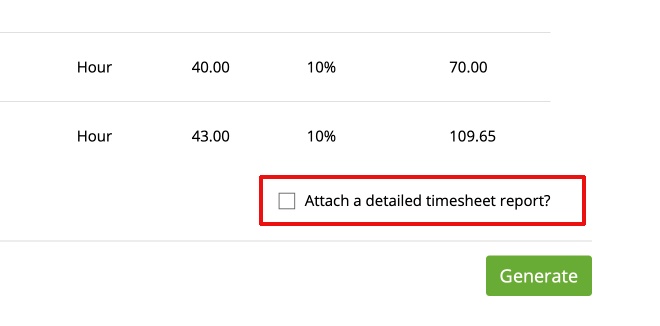
Afterwards scroll down in the Invoice creation overview and click the pencil to edit the timesheet name:

Edit the name to your preferred name and press “save”:
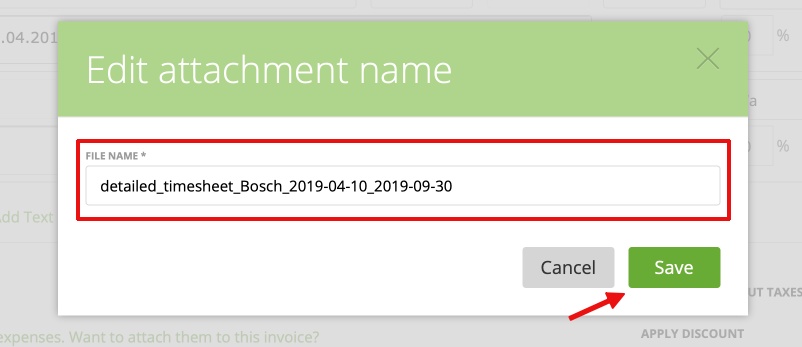
NOTE: zistemo only changes the name, if you send the invoice to the client. Also the name in the document space doesn’t change.
Change name on preferences
Go to Settings/preferences/defaults at the document names. There you can customize the file name of the detailed timesheets. You can use the shown placeholder (you can copy&paste them) but also enter your text to it. Please note that “hard text” doesn’t change as placeholders and will for all timesheets the same.
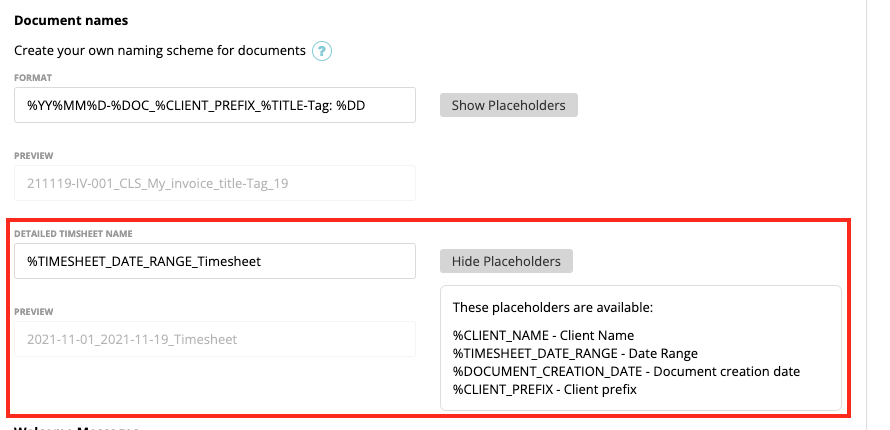
Even you set up on the preferences a custom name, you can change the file name manually when attaching it to the invoice again.
