This tutorial assumes that you have a Google Cloud account, so sign in to your Google Cloud account.
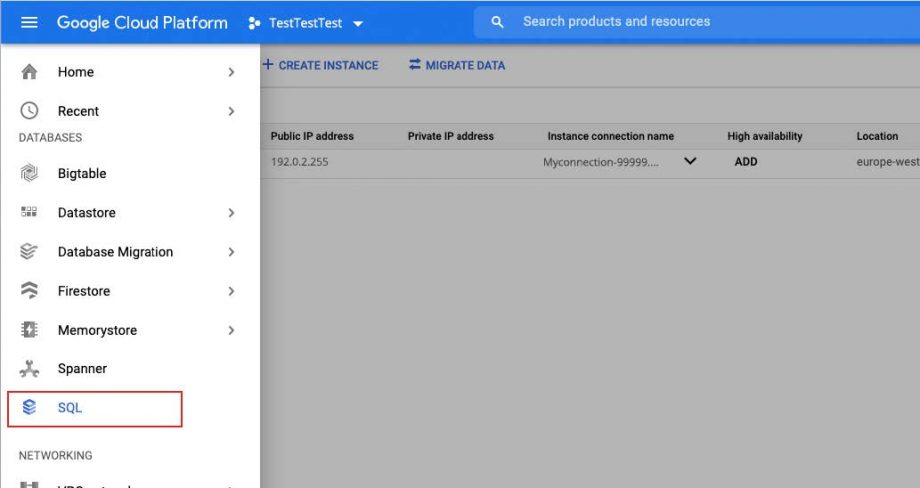
Go to “SQL” and click “Create an instance” at the top of the page.
Then choose MySQL. If you haven’t already, enable the Compute Engine API. This may take a minute.
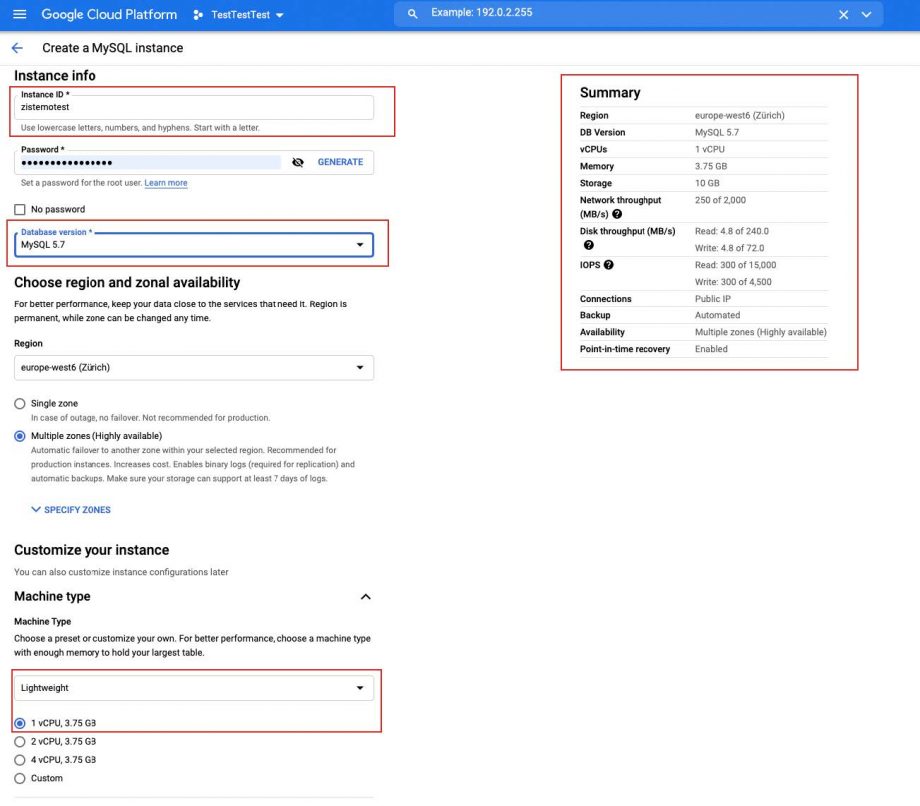
Enter the name of the MySQL instance and select MySQL 5.7 as the database version. Choose the region in which the server should physically be located … So, I choose europewest6 (Zurich). Then you can adjust the performance, storage space, etc. of your instance. We recommend starting with a lightweight and 10GB first.
You can change the customization at any time.
Click on “Create Instance”
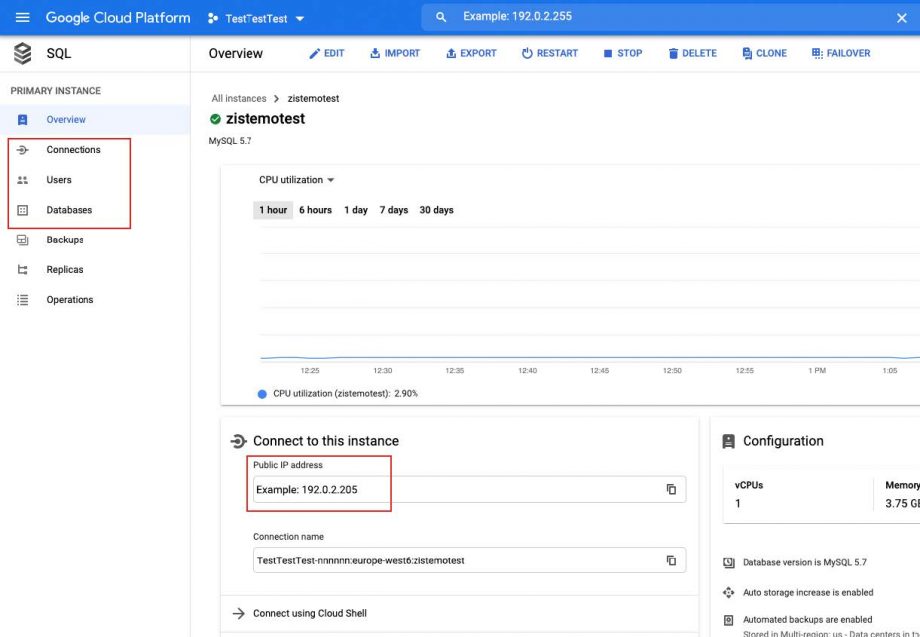
Great, you are now on your instance dashboard. It might take a few minutes for Google to create the instance. The most important parameter is your Host IP or Public IP address. You need it often for further connections. To complete the instance, you need to set up the
- connection,
- database
- and users.
Let’s start with the connection:
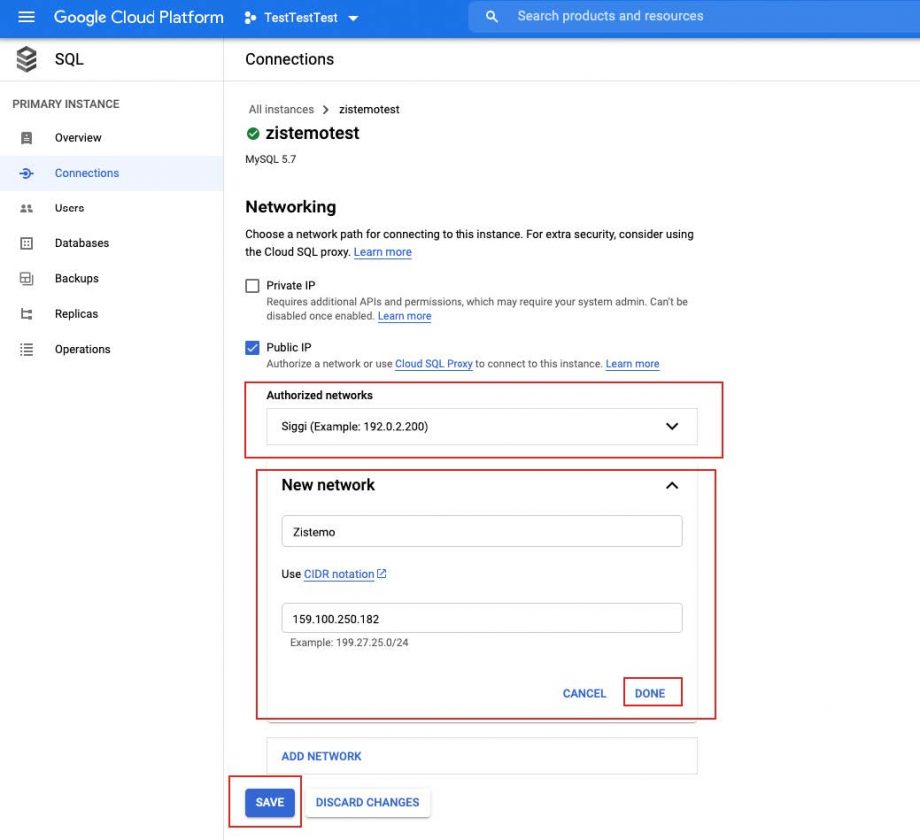
You need to allow two networks to Google. First is zistemo server and second is you
Zistemo Server
Allow that zistemo could send records to the database through the firewall. Enter the Zistemo sending address with the name “Zistemo” and enter the zistemo send IPAddress: 159.100.250.182
Your Network
Further, you need to add your IP address to the firewall/networking settings. Add a new network (you) – you can choose any name you want. Network have to be your IP address. If you have a dynamic IP address you have to add a new network each time it changes. Find your IP address →
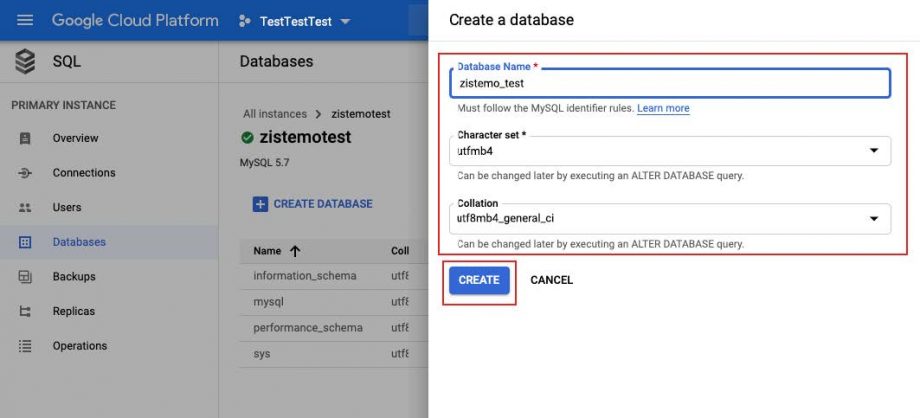
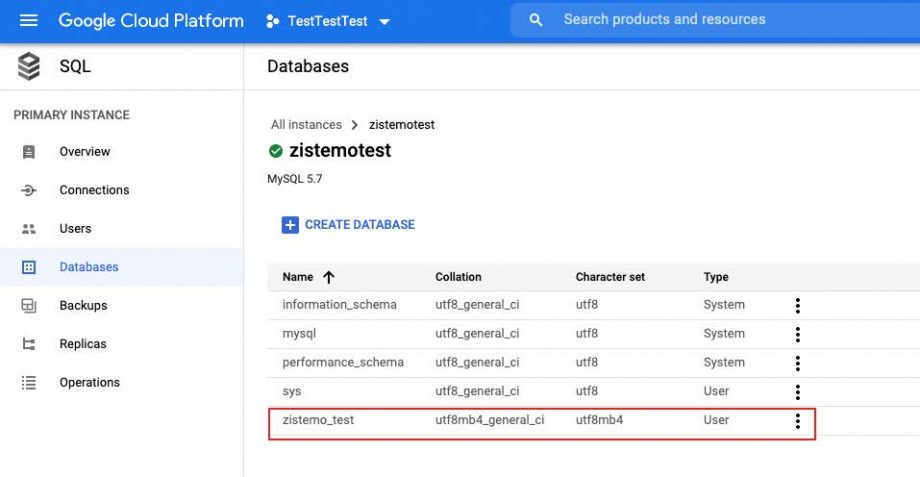
Ok, we have now set up the instance, but we still need the database. Go to the menu point Database and click on “Create database”. Enter the database name without spaces or special characters I call my one zistemo_test.
Important:
- select “utf8mb4” as the character set
- also select “utf8mb4_general_ci” for the collation.
…and then click “Create”
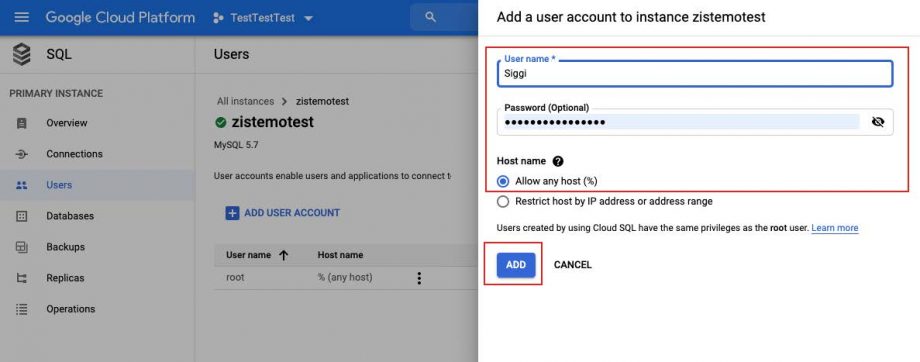
The final step in setting up Google Cloud SQL is to add the users. Go to Users and click “Add User Account”. I have set up “Siggi” as the username and accept the suggested password. Choose the option “Allow any host” and click “Add”.
Connect Google Cloud SQL Database to your zistemo account
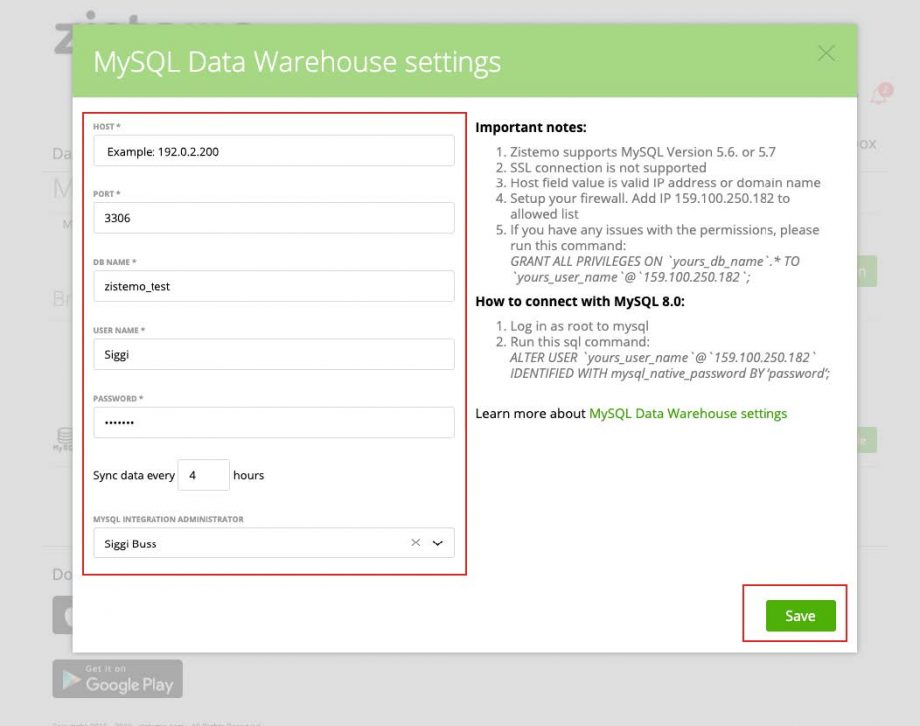
The next step is to connect your Google Cloud SQL database to your zistemo account: Go to your user profile and choose “Integration”, then “Add Integration” and choose “MySQL”. The MySQL Data Warehouse Settings window appears.
- Enter the host IP address that you can find in your instance overview.
- Insert as port: 3306
- Enter your database name that you created in the SQL Databases menu.
- Enter your username and password as created in the SQL Users menu.
- We recommend automatically syncing the data every 4-8 hours as you can manually sync at any time
- If your company has multiple zistemo administrators, select one who should receive the error messages.
Save it and that’s it.
Test Connection with MySQL Workbench”
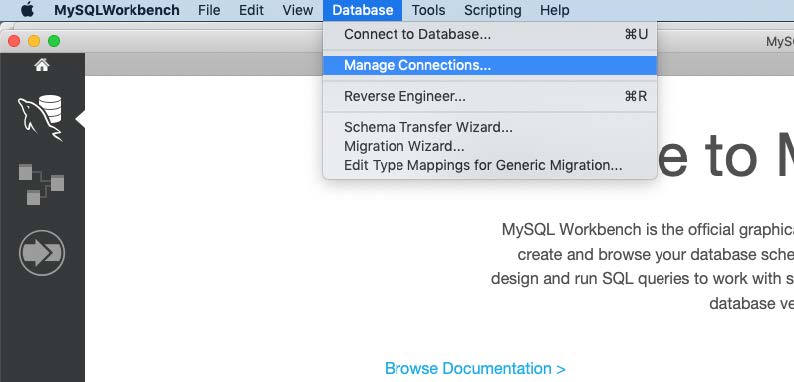
Let’s use “MySQL Workbench” to test that the database is working. If you don’t have the SQL Workbench, you can download it for free here. If you are not familiar with MySQL Workbench there’re tons of free tutorials on YouTube. Open the SQL Workbench and create your connection. Select “Database” and “Manage Connections …”.
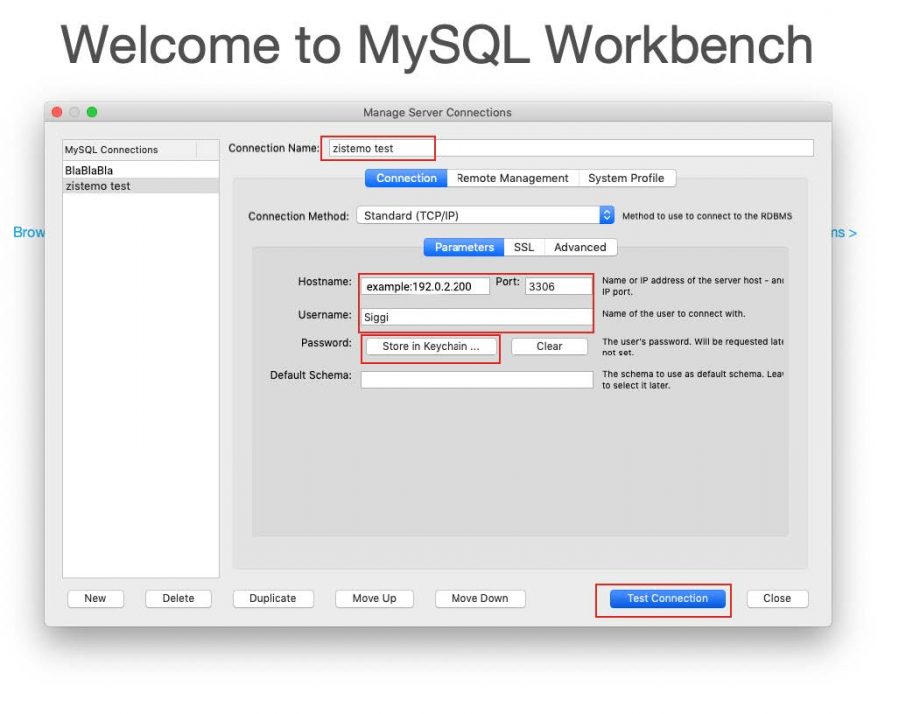
Click on “New” and give the connection a name. I call my “Zistemo test”. Enter the Host IP address that you can find in your instance overview. Insert as port: 3306 Enter your username and password as created in the SQL Users menu. Click “Save to Keychain” to automatically save the password.
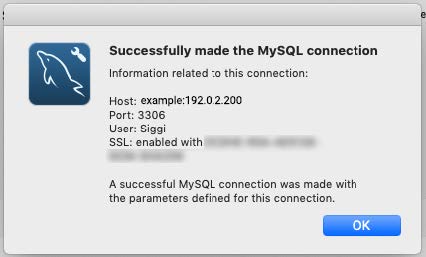
Click on “Test Connection”. If you get an error message, check all parameters: Host IP, Port, Username, Password and check if your current IP-Address is really stored in the Google Cloud SQL “Connections”. If you insert all the parameters correctly, the “Successfully made the MySQL connection” window appears.
Close the “Manage Server Connection” window and select from the Menu “Database” and “Connect to Database”. You find all stored settings there and you just need to click OK. Perfect, you are connected and ready to create queries. If it doesn’t work, go through the tutorial again and try a second time. If it still doesn’t work, send the screenshot of the error message to Customer Service. Otherwise enjoy your zistemo Data Warehouse. 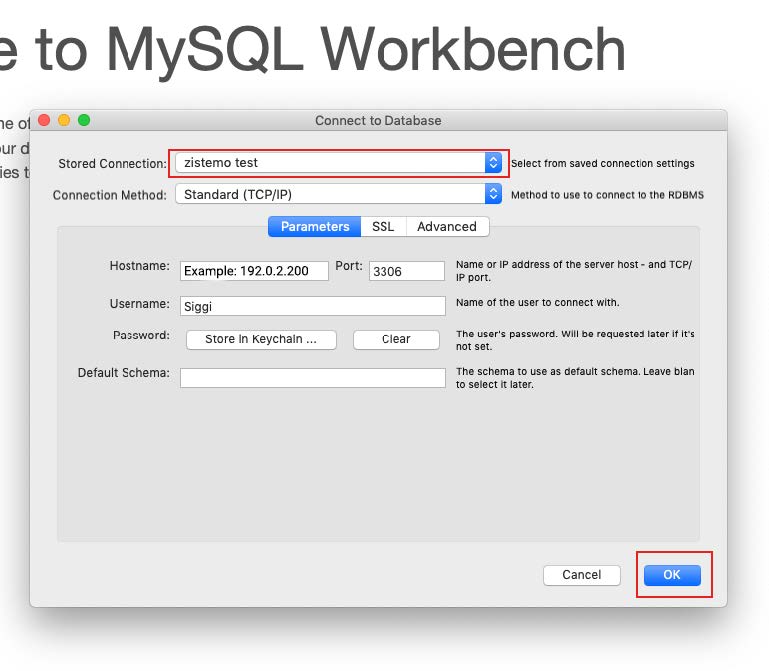
You can find Tutorials for our zistemo datawarehouse here.
