1. Create Mileage
2. Mileage Rate
3. Mileage Billing
4. Mileage Settings
4.1 Automatic Tax on Mileage
4.2 “Attach to project” is checked by default
4.3 Notes, Departure, Arrival are required “field” settings
4.4 Enable mileage approval process
4.5 Manage Trip purpose
4.6 Delete all mileages
5. Mileages – compensated or not compensated
6. Convert Mileage to Expense
7. Bulk action
1. Create Mileage
Zistemo allows you to create mileage records. You can do it by going to “Purchases” -> “Mileage Tracking”.
![]()
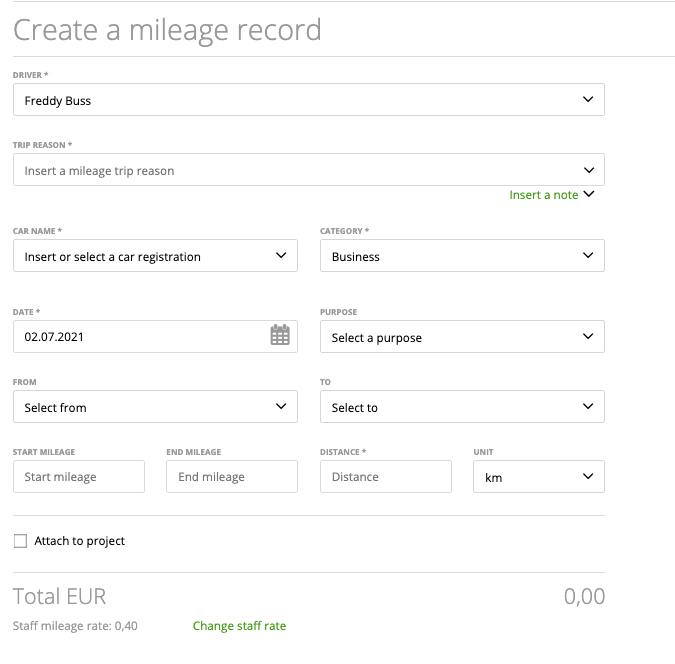
Click the “Create a mileage” button and start filling in the details:
– Driver is the user who has driven the vehicle
Note: Only if you are an account owner or an admin you can see and change the driver of the mileage.
– For “Title” – it’s the title of your mileage and you’ll see it later on the mileage grid:
![]()
– “Car name” – is the name of the vehicle that you gave it on the fleet
– “Trip Reason” – was this mileage a private or business trip?
– “Date”, “Start time” – when was the car used?
– “From”, “To”: Start and End position
– “Start Mileage”, “End Mileage”, “Distance”, “Unit”– distance is needed in order to calculate expenses. Unit for km/miles
2. Mileage Rate
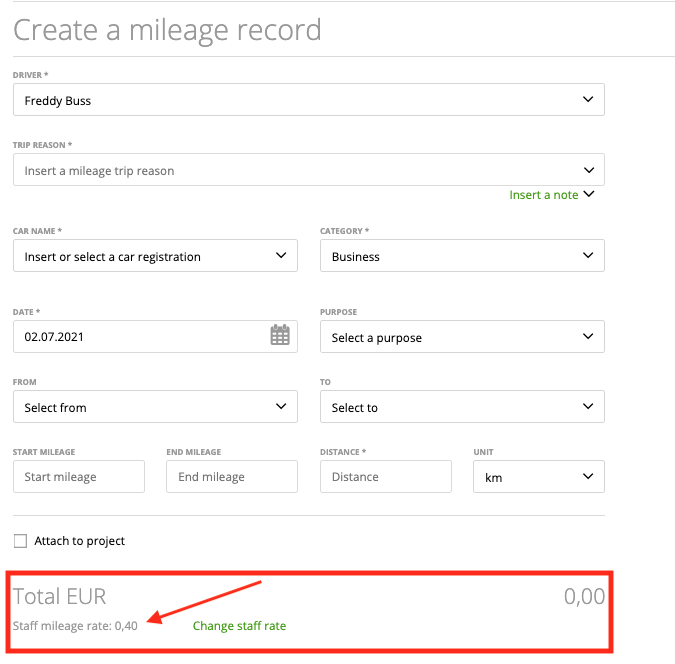
Mileage amount is calculated as distance multiplied by rate. By default, “Rate” is the mileage rate of a mileage author. You can see it at the end of the page, below the Total.
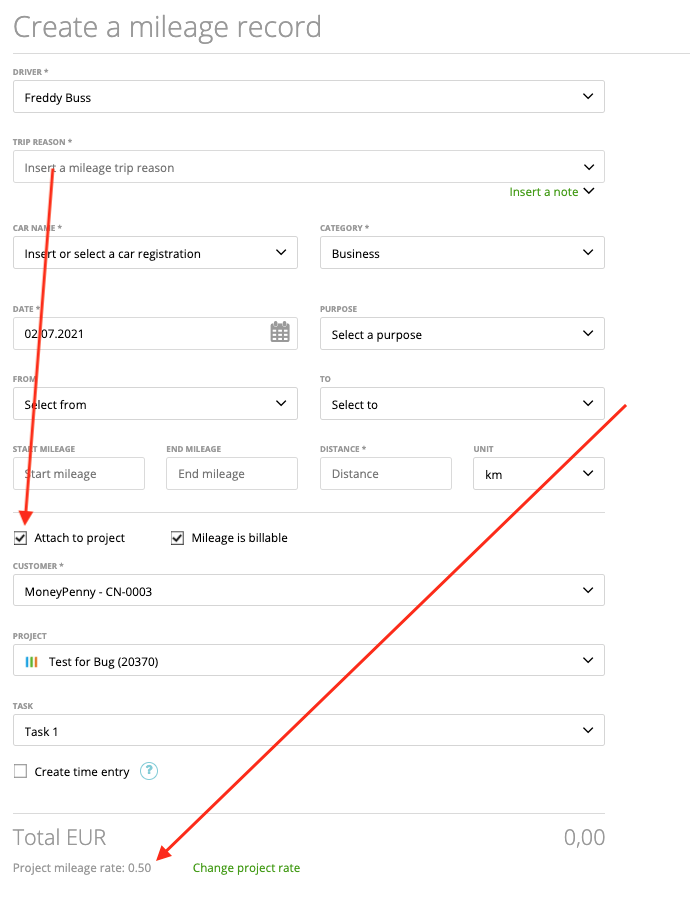
Click the “Change staff rate” link and you will be redirected to the Edit Staff Member page where you can modify it. If your mileage is attached to a Project, then the mileage rate of the project is used.
3. Mileage Billing
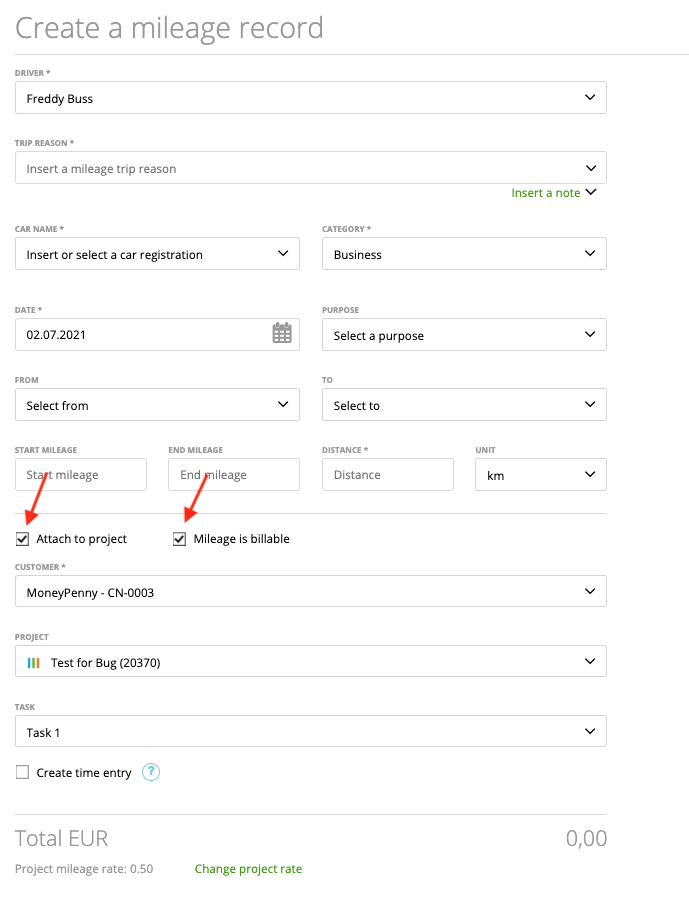
To make the mileage billable, first, assign this mileage to the client and check the box “Mileage is billable”.
Tip: You can also create time entries via mileages, click here to learn more
Now you can attach this mileage to the invoice. Click to “Create An Invoice” -> choose Client -> click “This client has unbilled mileages. Want to attach them to this invoice?”
![]()
Next, choose the mileage from the list and click “Attach Mileages”.
![]()
Now the mileage is included in the invoice and you can click “Activate and Send” (on the invoice) to bill it to your client.
You also can create a time entry directly on the mileage. Learn more about create time entries via mileage
4. Mileage Settings
4.1 Default Tax on Mileage
Go to “Settings” -> “Preferences” -> “Mileage” and enable the “use the default tax on mileages” option. You do not have to add tax manually on each mileage afterwards.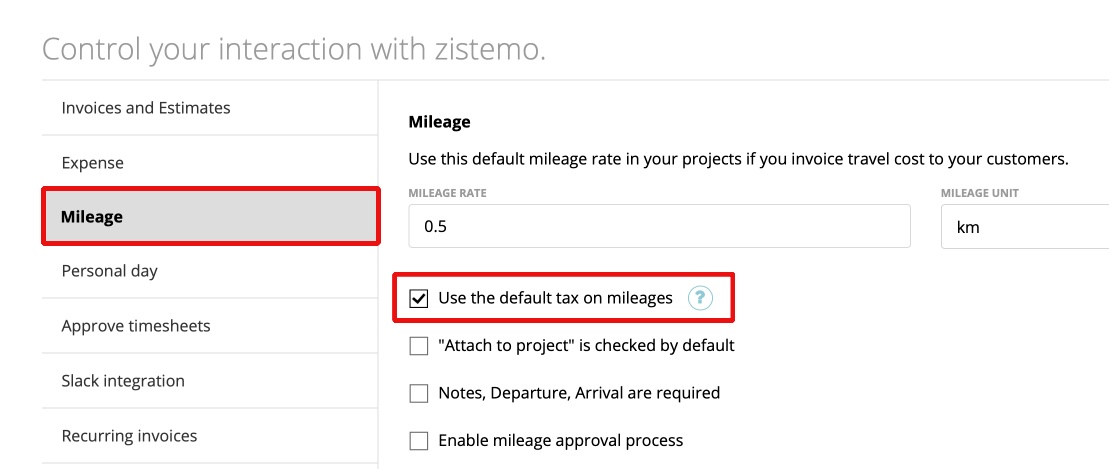
4.2 “Attach to project” is checked by default
This option allows, to set the option “attach to project” is checked by default. So you never miss to add a mileage to a project. First choose this option in the settings and enable it: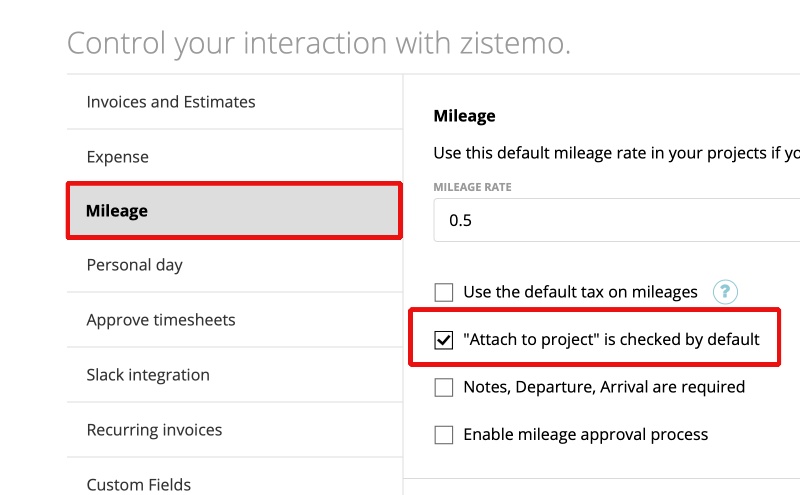
Afterwards “attach to project” will always be checked: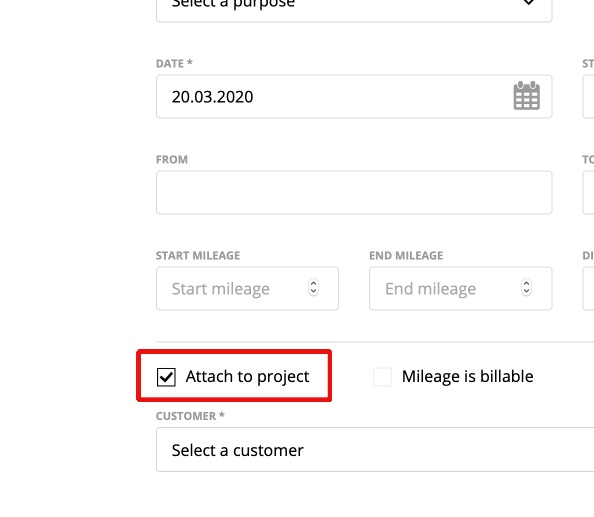
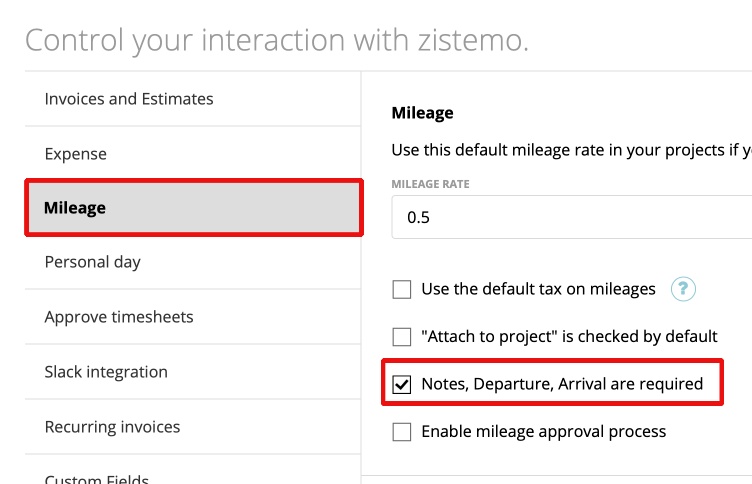
4.3 Notes, Departure, Arrival are required “field” settings
If you enable this option, the fields “Notes, Departure, Arrival” will be required fields. You can also disable it.
4.4 Enable mileage approval process
If you need a more detailed approval process for your mileage, you can enable it on settings/preferences:
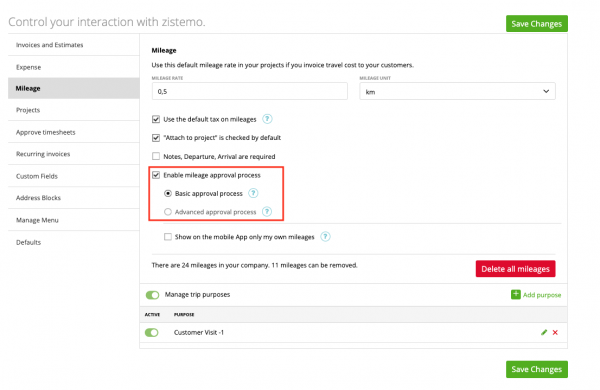
You need to choose between basic approval process and advanced approval process.
4.4.1 Basic Approval Process
In easy words: user submits mileage -> team leader reviews mileage -> admins approves mileage.
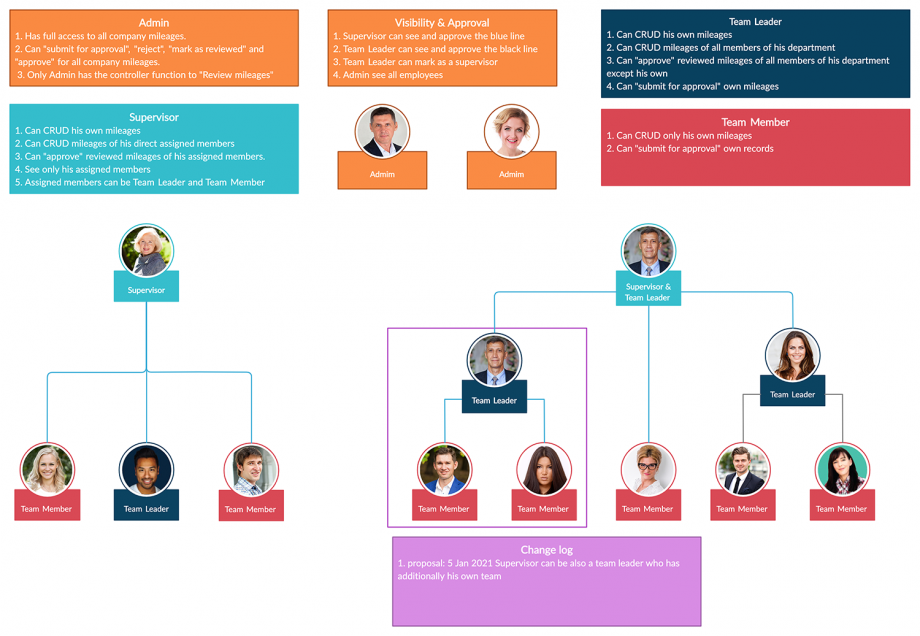
What can the user roles do in the basic approval process?
Account Owner and Admin: full access to all mileages, can submit, reject and approve, can not mark as reviewed
Team Leader: Create, read, update, delete own + team member’s and capture data’s mileages, can reject and mark as review mileages
Team Member: Create, read, update, delete own mileages only
Capture Data: Create, read, update, delete own mileages only
Department leaders do not count into the basic approval process. To consider department leaders as approving persons please use the advanced approval process.
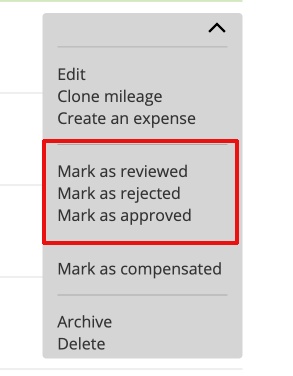
On the line end menu you can make actions like mark as reviewed, rejected and approved. The Mileages can not be edited, as long as it is “reviewed or approved”.
If you mark a mileage as “rejected”, you should add a reason to the rejection:
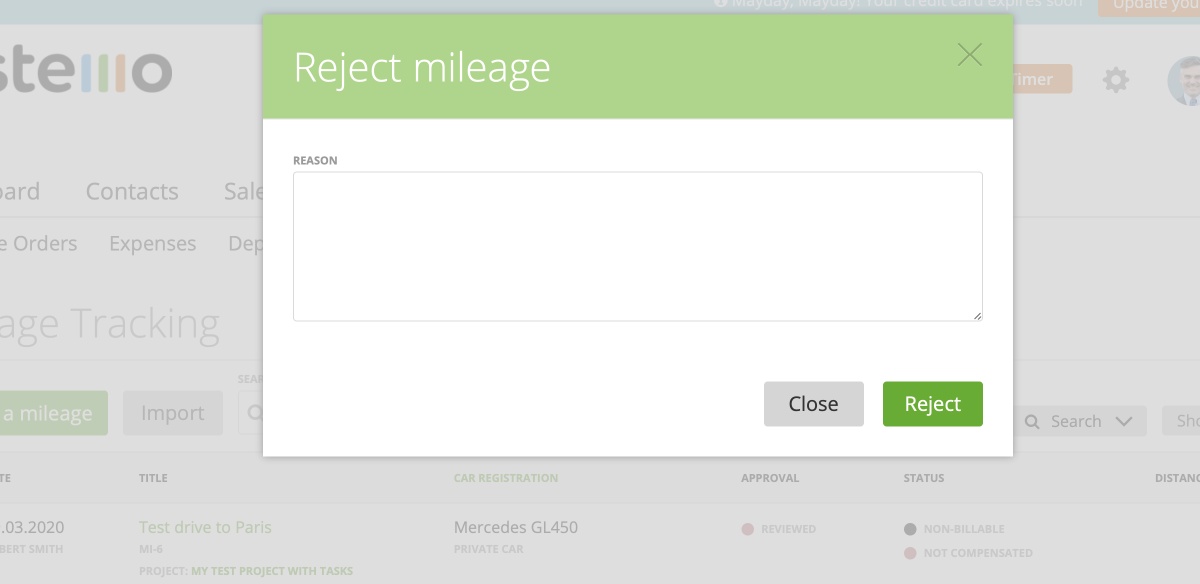
4.4.2 Advanced Approval Process
In easy words: user submits mileage -> admin/team leader (supervisor) reviews mileage -> department leader approves mileage
What can user roles do in the advanced approval process?
Account Owner & Admin: full access to all mileages, can submit, reject, approve and mark as reviewed
Team Leader as Department Leader/Member: Create, read, update, delete own + all department members mileages; can reject and approve mileages of department members but not own mileages (must be approved by owner or admin), can submit own mileages
Team Leader as no Department Member: Create, read, update, delete own + team member’s and capture data’s mileages; can reject and approve mileages from team member’s and capture data’s but not own mileages (must be approved by owner or admin), can submit own mileages
Team Member: Create, read, update, delete own mileages only
Capture Data: Create, read, update, delete own mileages only
4.5 Manage Trip purpose
You can also add trip purposes to the mileage form. Simply enable “manage trip purpose” option and “add purpose”: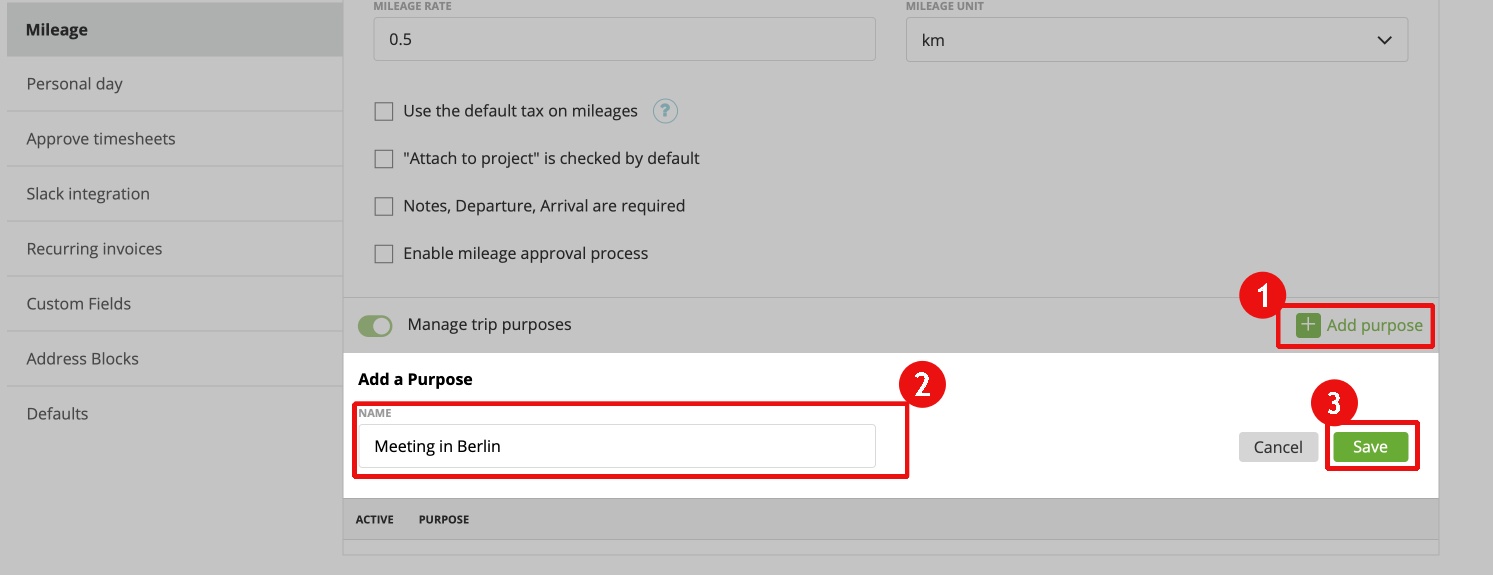
Afterwards you are able by creating a mileage to enter your pre-defined purpose: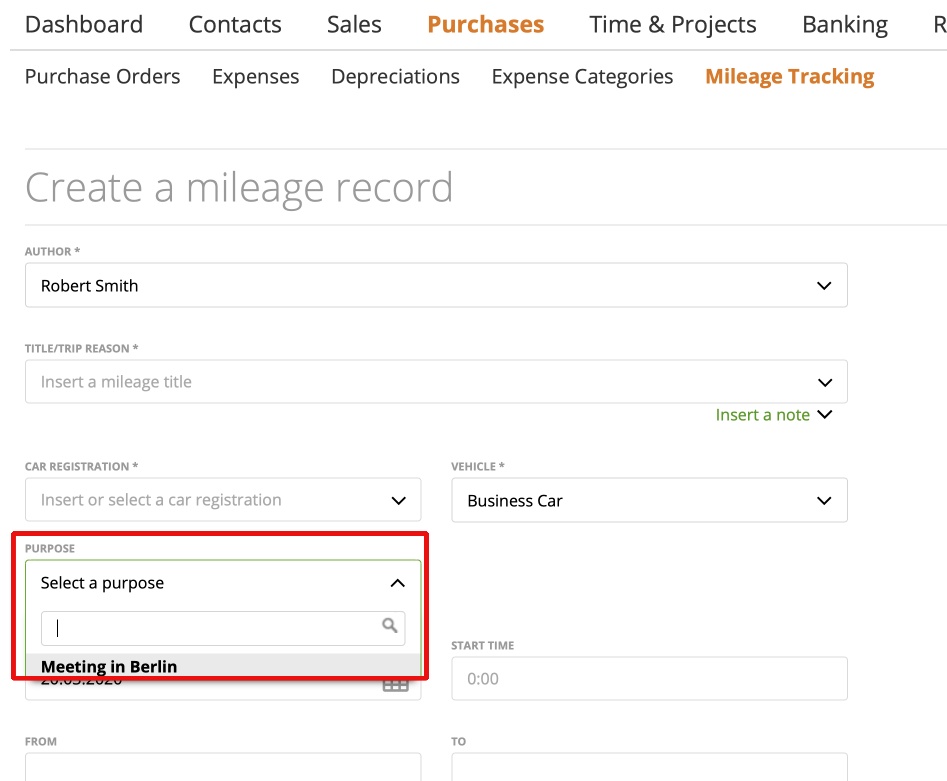
4.6 Delete all Mileages
On Settings/Preferences/Mileages you can delete all mileages with on click:
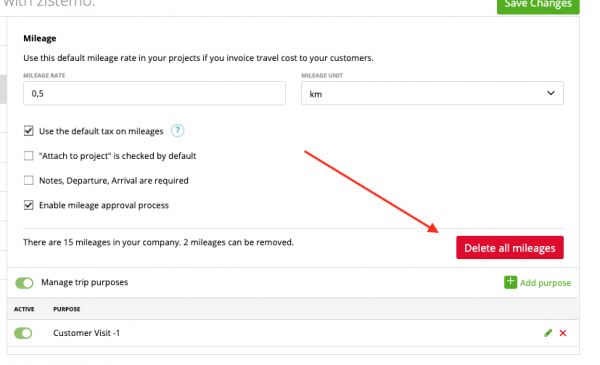
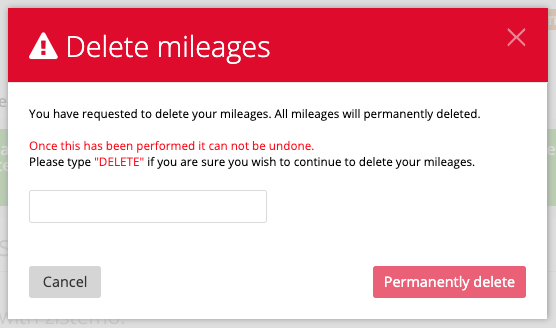
If you click on “Delete all mileages” a window open where you need to confirm to really delete all mileages. Please note that if you delete all mileages, there is no way to get them back but to create them again.
5. Mileages – compensated or not compensated
You can mark mileages as compensated or not compensated. Just choose this option from the row end menu of the mileage record.![]()
6. Convert Mileage to Expense
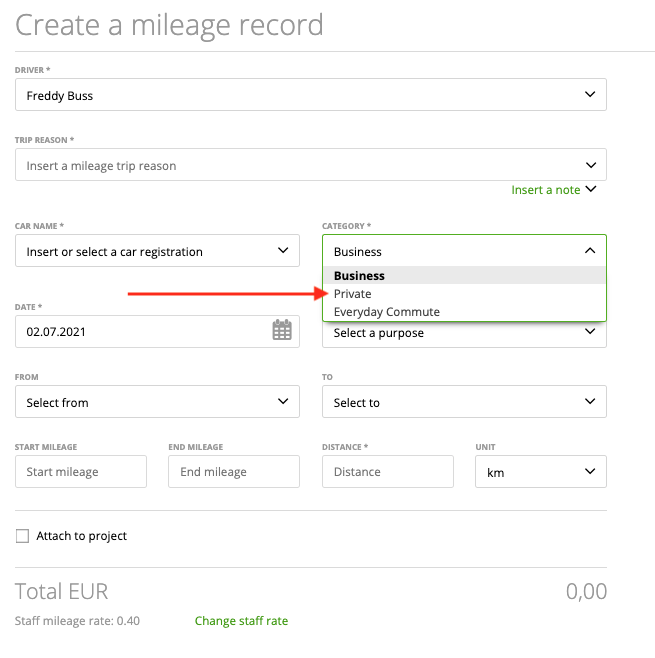
If you made a bank transaction for a mileage reimbursement to a staff member that has a private milage, you can convert a mileage into an expense and in this way you can explain the transaction you made for these mileage allowance. Please note that you can only convert mileages to an expense that made with a private category.
Create a mileage and choose private category:
After creating a mileage you can create an expenses via the dropdown in the mileage list: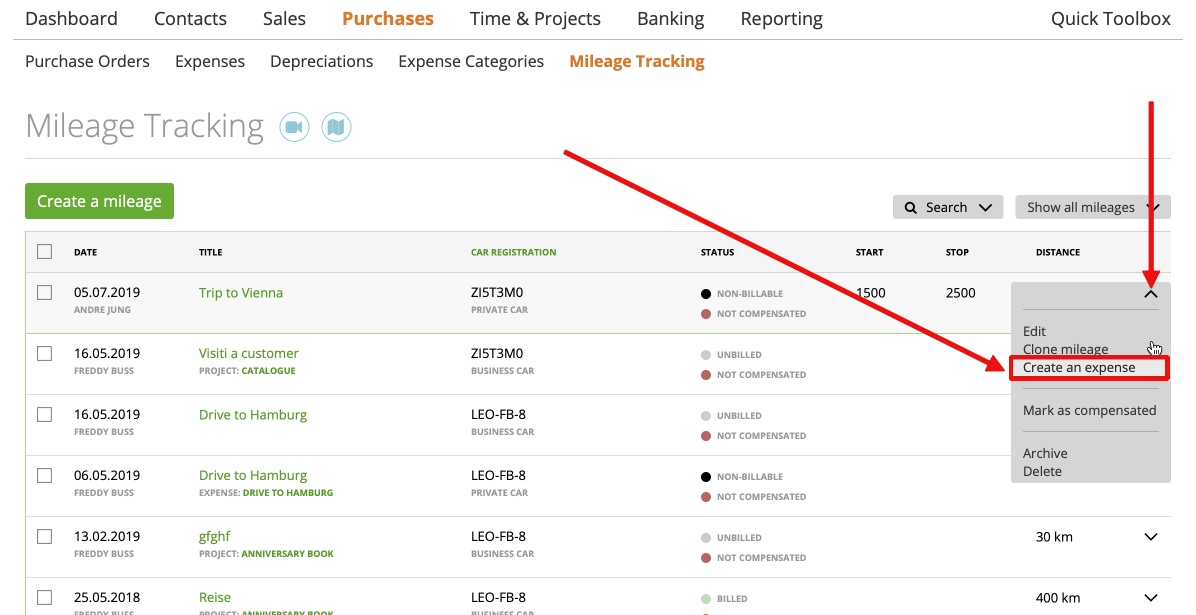
“Add Expense” to create the expense: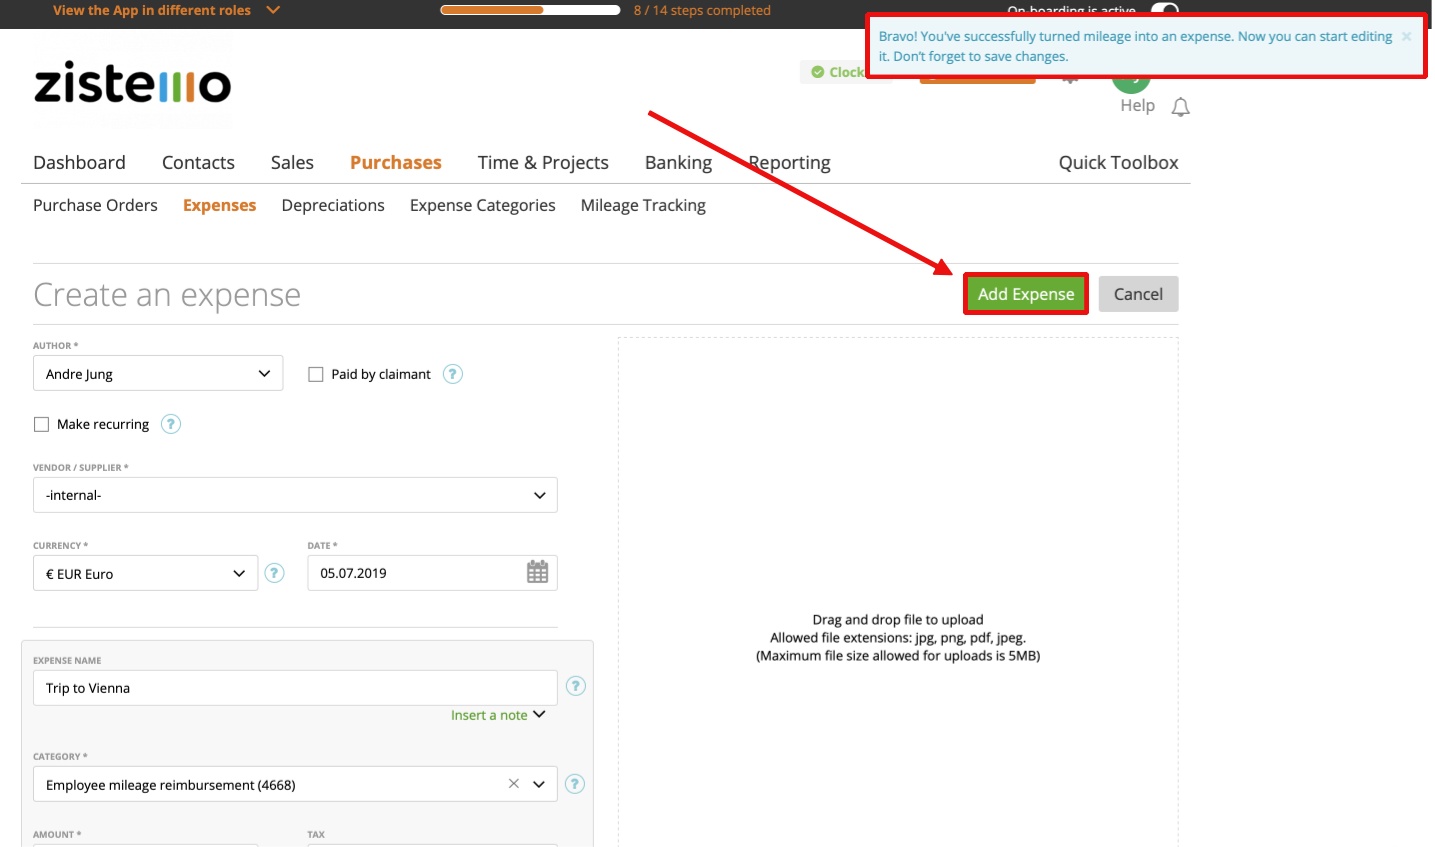
In the Mileage Tracking overview you can also see the connected expenses on each mileage: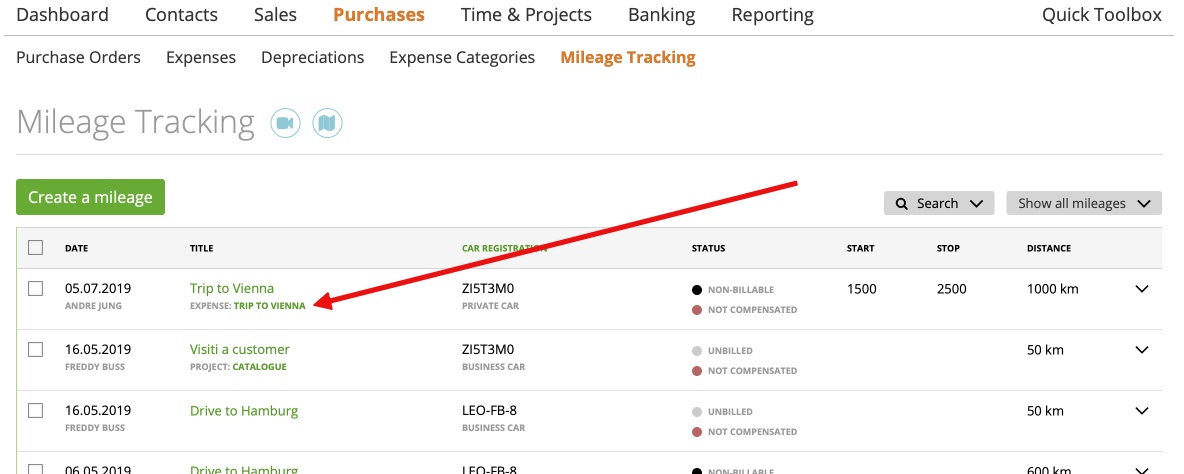
7. Bulk action
You can use bulk actions for mileages by marking the check-boxes on the grid.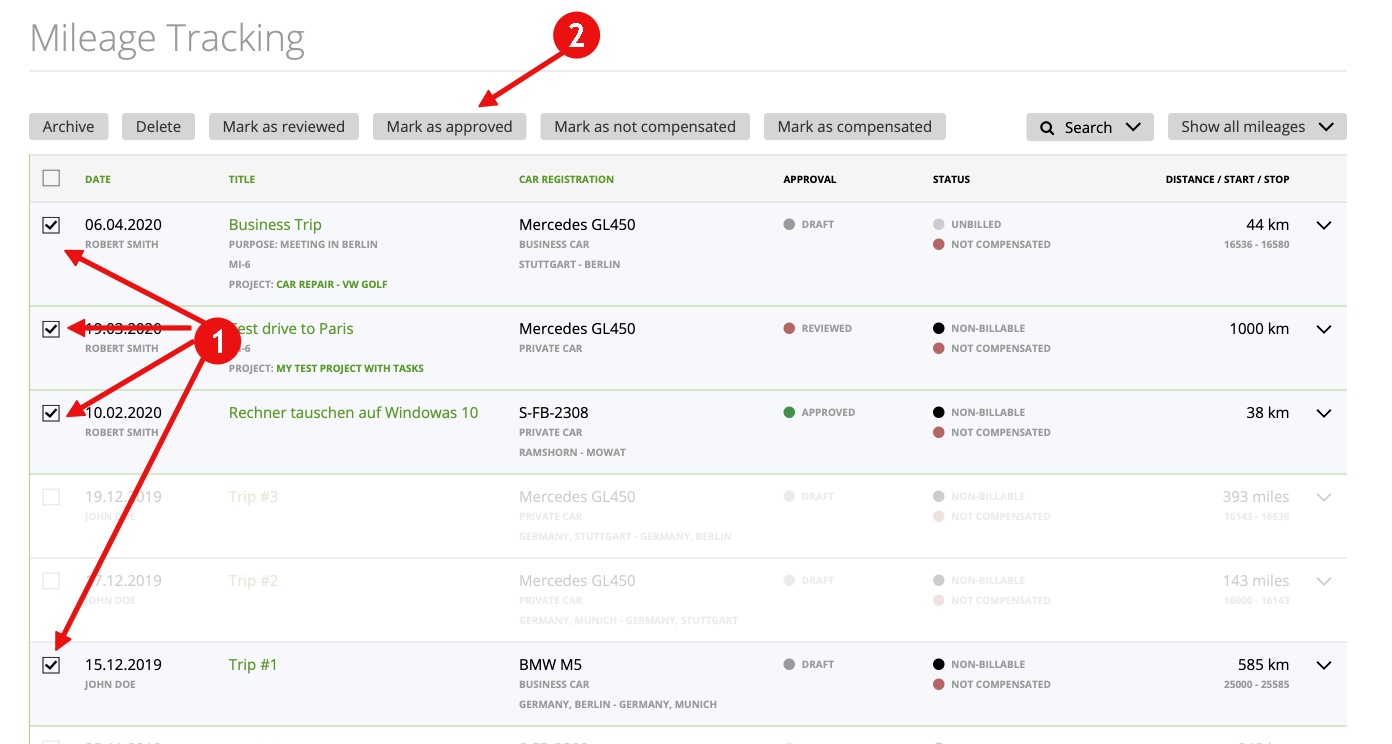
Available bulk actions:
– archive – archive the estimates
– delete – delete the estimates
– mark as reviewed
– mark as not compensated
– mark as compensated
Rejection we do not support as bulk, since every rejection needs a comment.
